Modern Neutral Paint Pairings for Selling Your Home

Modern and neutral paint is an important part of selling your home, especially if you want to sell it quickly. Neutral colors make the house look larger and they can also help a buyer feel at ease with their new purchase - a home that is freshly painted in easy-to-love colors means they can comfortably move in without having to worry about repainting. Buyers love a fresh, clean slate and a home that is move-in ready in the paint department.

If you're trying to sell your home, a fresh coat of paint is one of the easiest ways to give it a facelift and boost its appeal. A neutral color palette will make your place feel more spacious, cleaner, and friendlier - attributes that are sure to attract potential buyers.

To keep things simple, here is the easiest 5 step plan to creating the best modern neutral paint palette for your home.


The Basics

  1. Stick to a a very simple color scheme

  2. Choose colors from a very detached place

  3. Keep it light & airy

  4. Don’t forget proper prep & cleanup

  5. Bare minimum holes afterwards


  1. Stick to a very simple color scheme

When you're trying to sell your home, the last thing you want is for the buyer's attention to be drawn away from their dream kitchen or primary bathroom. Keeping your color scheme simple will ensure that a buy is able to focus on the features of the house and that your home's elements are unified and cohesive.

  • Choose one trim color throughout the house and use it on doors & windows, moldings, ceiling beams, light fixtures & fixtures in general (ceiling fans/lights).

  • Choose one wall color throughout the house and use it on all the walls. Use this palette wherever possible when painting accent walls/rooms with lighter shades as well.


2. Choose colors from a detached place

Marketing a property is not the same as decorating your home. Choose colors that are current and pair well with the permanent aspects of your home. Do not focus on choosing colors that you love or that fit your personal style. When preparing your home for sale, think about colors that have a broad, universal appeal – in other words: modern and neutral.

When it comes to the paint palette you choose for your home, there are two things to consider:

The permanent elements of your home. These include flooring, tile, wood stain colors and cabinets. It can be tempting when trying to come up with paint plans for selling your house quickly to pick something unique and different from all of the other houses for sale in your area – but it’s better to go with a timeless plan and choose colors that work with the house itself.


Current trends. What colors are popular right now? This is important because if you're selling your house soon, it's likely that potential buyers will be looking at many other homes in the same area. If yours doesn't match up with what's trending in newly built or renovated homes, it could make it more likely they will choose another that feels more updated. Alternatively, if yours is the only home with a fresh, modern, neutral paint job, it makes your home stand out above the rest.

Ultimately, you want to choose colors that compliment your homes features, creating a fresh & inviting property for a potential buyer. Remember, choosing this palette is about enhancing and marketing your property so be wise and choose from a detached place.


3. Keep it light and airy

Light colors have the added benefit of making small rooms appear larger than they are, making them ideal for spaces with low ceilings or oddly shaped walls.

The best way to ensure that your paint choice will work well in any space is by selecting 1 or 2 light, neutral shades that complement each other well.

Light colors can help create a beautiful sense of space because they reflect natural light more effectively than darker hues do; this means that the light from windows and skylights can bounce off walls in bright rooms without being absorbed, giving the rooms an open, airy feeling.

Light paint colors also make rooms feel cleaner than darker ones, which is so important to potential buyers.

Finally, adding brightness to your home by painting walls light, neutral colors creates an inviting atmosphere that makes visitors feel welcome.


4. Don’t skip the proper prep & finishing details

If you are painting yourself, this one’s for you.

It’s important to prep your walls before painting them so that the paint has a professional finish. This will ensure a smooth end result and save you time in the long run. Do not skip washing walls well, filling holes, sanding, and removing dust with a tack cloth.


Prep the trim properly. The trim around your door frames, windows and baseboards are often overlooked when it comes to prepping before painting, but they need just as much TLC as the walls themselves.


Once everything is painted with a fresh coat or two, be sure to clean up any drips or brush marks that might have gotten on the ceiling or floor. Nothing will ruin an otherwise nice paint job like messy edges, drips, or ripped paint from tape tearing. Take the extra time to make sure that your hard work isn’t wasted by finishing this final step.


5. Bare minimum holes in the wall afterward

Be very selective about the holes you put in the wall afterwards. New buyers really appreciate a freshly painted house with perfect walls.


There are only a few critical places I would consider putting art back up on the walls after painting. These are places that often need some softening to stage the home and make sure it looks loved and well-kept and not empty or cold.


The only places I would possibly hang art on fresh walls are:


• above a sofa on an otherwise empty wall
• above the primary bed with a low headboard (tall plants or leaning art / mirrors on nightstands is an alternative to this)
• in a dining room on an otherwise empty large wall
• above a mantle that can’t have leaning art / mirrors.
• if it’s a place that any other owner would clearly put art and it only requires a small hole: above the toilet or towel bar in a main bathroom.

As much as possible, use light art like canvases rather than heavy framed pieces with glass. I also recommend using small nails or thin hanging hooks (these are my favorites) to leave the smallest possible holes.

If needed, place some small adhesive felt pads on the back corners to prevent the art from scratching the paint.


I use alternatives to hanging art whenever possible:


• create height and alternative focal points in other ways
• get big & tall – vases with branches, large plants, etc
• lean large art or mirrors on tables
• bring in texture – woven baskets, blankets, pillows
• divert the eye to new focal points like a large plant or tall lamps
• give the space character and style in other places in each room


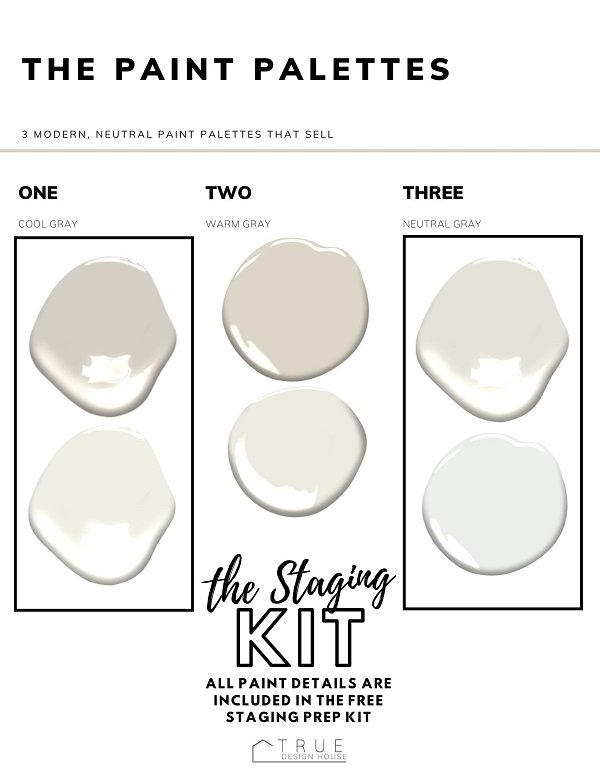
The neutral paint schemes below are 3 of my current favorite modern, neutral paint pairings. Each pair is a way to create a space that feels modern and fresh. They are natural, calming and timeless — all qualities you want when selling your home.

Click the download button at the bottom of the page to download the Staging Prep Kit and get all the paint color details & codes!


7 Scents That Sell: Realtors Wish All Homes Smelled Like This

If your house is for sale, your realtor is probably hoping you won’t overlook the way it smells when potential buyers come to view it. Real estate agents have a very good reason for wanting your house to smell it’s best before showings and open houses: scent has an incredible impact on a buyer’s perception of your home.

Creating a ‘subtle but pleasing’ scent ambiance for showings is as important as making sure your home doesn’t smell bad. Including this task on your to-do list when getting your home ready to list for sale will have a huge payoff.  After all, not only do you want to avoid the embarrassment of turning off potential buyers with strong unpleasant smells, but you want to help them fall in love with your property by making it smell just plain good, too.

Read on to find out the top 7 smells that sell houses.


Before Getting Started: Clean & neutral

Start off by giving the house a good deep clean in any areas you know are sources of any smell at all.   Soft surfaces like carpets, upholstery, pet beds, and comforters all absorb smells and might need a cleaning or wash.   

It’s easy for a homeowner to stop noticing the smell of their own home, so don’t be afraid to ask someone close to you to be honest and tell you if there are any lingering smells you’ve just gotten used to.

Next, open as many windows as possible for as long as possible before listing your home and before any showings.  Nothing will ever top fresh air circulating to help clear out any ‘lived in’ smells in a home.  Even if you believe your home doesn’t have any particular bad smells (and many don’t), fresh air just helps things smell, well, fresh.

Harsh truth:  without this clear foundation, adding scents to the mix can create a (bad) potent combination.  If you need to have a strong good smell to cover up the bad, this just has the potential to make buyers wonder just what you are covering up or, more likely, they will just smell the bad right along with the good and the mix of both is often a huge turn off.


The Basics

  • Start with a clean slate – clean & air out the house first

  • Keep it simple – use a single scent through the house

  • Keep it subtle – use scent very lightly


The Top 7 Scents That Sell Houses:


  1. Citrus


2. Coffee


3. Cinnamon


4. Fresh Laundry


5. Soap


6. Spa Botanicals


7. Vanilla


How-to Ideas

Diffuser – use only a drop or two of oil

Reed diffuser – less reeds makes for a more subtle scent

Simmer pot – simmer some fruit, herbs or cinnamon in water before a showing (turn off and remove or clean up the pot before leaving)

Candles – ‘blow out’ before leaving  For smokeless options: use a snuffer, bend the wick into the wax with tweezers, or pinch out the flame with wet fingers (don’t burn yourself!)

Wax melts – use these sparingly – either make sure the melt has been used for a few days or only put in a quarter of a new cube before a showing.  These can be way too strong for some people full-strength.

Dried bowl – add scented dried organics to a bowl, either natural items like lavender or rosemary, or oil-infused décor items like pine cones and wood curls.

EO on cotton balls / cloths – tuck inside bowls, behind decorations, behind plants

Dryer sheets – tuck inside garbage cans or furnace vents in each room


The

Staging Prep Kit is here & it’s free!

If you are getting ready to sell your home, this is for you.

If you are a realtor and looking for a staging plan to include in your new client kits, this is also for you!

A curated, strategic grouping of my checklists & tips for staging your own home. I created it to teach you exactly what you need to do and how to do it as simply as possible.

Ready for free & immediate download!


Classic Colors for a Front Door

Looking to repaint your front door with the most inviting classic colors for 2021?   This collection of 7 Benjamin Moore paints is perfect for the job and scores extra points with red brick houses, dark wood houses, or any dark brown stucco or siding colors.

No color family is more serene, deep and classic than rich, warm autumn colors.  If you’re looking for an easy refresh for your front porch, I’m happy to share a collection of my favorite front door paint colors today.

These colors will work with lots of different house colors and materials, but especially those in the dark, warm color family – dark wood, deep brown stuccos & sidings and classic red brick.

Special note for brick houses: Red brick houses look best with a rich door color, either light or dark,  but something with lots of saturation.  These door colors will hold their own against the rich red brick color and the strong pattern of brick walls.


Watch the video below to see my collection of the 7 most inviting classic front door colors!


While you’re painting the front door, don’t overlook some other simple updates that have big impact – I’ve created a list of the best doorbells, knobs, knockers, house numbers, planters and porch lights for your 2021 front door update!


This post contains affiliate links. For more information please click on the 'policies' tab at the bottom of this page.


Download this graphic, including all the paint names & codes in the Resource Library!


Want to Pin to save for later?

Here you go!

Staging helps sell houses. Turns out, it also helps sellers feel good. Why?

true design house - staging prep kit - 59 - img 1.jpg

Sometimes people resist staging their home when they list it for sale.

Why should I *have to*?

It seems like a lot of work.

My house is fine.

We still live here – this isn’t a show home.

It’s a nice house as-is.

The market is good, I don’t have to do anything extra to sell.

It’s my real estate agent’s job to market it.

I will price it right.

so….

I don’t need to and I’m not going to.

Well, everything in that list might be factually correct.  The bottom line is that you do not have to stage your home.  No one can make you.  If you do not want to, then don’t. 

However, there are some very good reasons you should want to. 

Through what can be a stressful and overwhelming process, there are some very good reasons that staging helps you feel better and even if that was the only benefit (it’s not), then it’s likely worth the effort.

Listen to me:

Staging your own home is a gift to yourself.

Here’s why:


1.       Staged homes sell faster than unstaged homes

Let’s start with the most obvious one.  According to the Real Estate Staging Association, staged homes spend 73 per cent less time on the market than their unstaged counterparts.

I find these stats are hard to prove because there are just too many variables, but the exact numbers are irrelevant. 

The critical fact is that with all other things being equal, staged homes sell faster than homes that are not staged.  They just do.

Once you’ve decided that you want or need to sell, once you have a new home on the horizon, once you live through preparing for a showing or an open house, you know that a quick sale would ease so much of your stress.


2.       Staged homes sell for more money than their unstaged counterparts

This is another statistic that is thrown around quite a bit with varying percentages attached that is just impossible to verify the exact numbers, but in the end, this fact remains:  a home that is staged will normally sell for more money than an unstaged similar home in the same neighborhood at the same time. 

The National Association of Realtors says that a staged home will sell for 17% more on average than a non-staged home, and 95% of staged homes sell in 11 days or less. That is statistically 87% faster than non-staged homes. 

Another stat says that the money invested in staging will be far less than a first price reduction, so why not invest upfront so that you can sell faster and for more money in the end.   This is one stat that I don’t always like only because I know from experience that staging can often be done without spending a penny!   However, if your home needs some more work like painting or professional cleaning, or even just purchasing some décor, drapery or styling accessories, the idea is that even if you spend a bit of money upfront, you will still come out ahead if you can sell before having to consider reducing your asking price.


3.       Staged homes make impact in listing photos = online pausing = interest = inquiries & showings = offers = moving toward a sale

A home that is well-staged is going to make for attractive photos and those photos are the most important part of your online listing!  Appealing photos are going to cause buyers to pause their scrolling, take a good long look and start to consider your home.  This leads to more inquiries and showings, and the natural next step there is that there will be more offers.  All of these are necessary steps to getting offers and selling your home.

Competition is fierce and you have mere seconds to convey good & important things about your home through just a handful of curated photos.  Make them count by having the details styled and staged.

If people are not attracted to your home through their first point of contact (the listing photos!) they are never going to even come take a look, and without coming to see the house in person they are highly unlikely to ever make an offer. 

Well styled & staged photos matter!


4.       Staging reduces pre-showing stress

Once you have buyers interested in your home through your listing photos, the next goal is for them to come take a look by booking a showing with their realtor.  Getting a showing for your home is so exciting and such positive news, but it is also one of the most stressful points in the selling process.  These people are coming to look and they are going to be looking closely!

This is where the staging you did earlier comes back to you as a gift and a hug. 

The first phase of staging is all about reducing clutter, fixing small problems, starting to pack, and streamlining your home… all of these things help reduce the volume of things you need to deal with in the hour before a showing.  Staging takes so much ‘noise’ out of your home which just means you have so much less to maintain daily and so much less to tidy and style before a showing.    

Staging for the first main event (listing photos) also allows you to see your home as it should be for showings, which means that you have a reference point and you have all things you need already – you are not starting from the beginning before that first showing.  There is no thinking or decision making involved, you are just resetting each room back to how it looked in the listing photos.

Simplicity and a clear plan will reduce your stress so much – trust me, you will thank yourself for this!


5.       Staging = packing = simplified moving once you sell

‘They’ say staging a home removes or pre-packs about 30% of a home’s contents.  Incredible! (Though, again, difficult to prove the stat.)

Once your home is sold and it is time to start packing to move, this is yet another gift to yourself.  Having so much of your home packed and ready to go eases to burden of starting from the beginning during a time that normally has so much else going on at the same time.

Anyone who has ever packed a house to move knows what a big job it is, so doing this so far ahead of time is reason enough to stage.  If you could take 30% of the work off your shoulders, what a gift that would be.  This is one of those things that benefits only you and is such a good reason to stage!

Have I convinced you that this is a project worth tackling? If so, take a look at my new staging kit in the resource library! It’s a free PDF filled with a curated, strategic grouping of my checklists & tips for staging your own home. I created it to teach you exactly what you need to do and how to do it as simply as possible.


True Design House - Staging Prep Kit preview 2 - jpeg.jpg

The

Staging Prep Kit is here & it’s free!

If you are getting ready to sell your home, this is for you.

If you are a realtor and looking for a staging plan to include in your new client kits, this is also for you!

A curated, strategic grouping of my checklists & tips for staging your own home. I created it to teach you exactly what you need to do and how to do it as simply as possible.

Ready for free & immediate download!


The Biggest Wastes of Time You'll Regret When Staging Your Home


Stop wasting your time doing these 5 things when you’re staging your own home.

Getting ready to sell your home can be a chaotic time. There’s so much to do and one of the biggest and most time-consuming tasks is preparing your house for viewing. For most sellers, this means hours spent cleaning, decluttering, packing and repairing.

But, is some of that stuff a huge waste of time?

Well, yes.

Let me share with you the biggest wastes of time I see when I’m staging homes so that you can spend your time doing the things that truly matter.

 
True Design House - home staging - biggest wastes of time
Learn exactly how to professionally stage a bathroom that sells. Get the 3-step plan that covers everything you absolutely need to get right before listing your home. Bonus: Immediate, free download of my Ultimate Staging Checlist PDF list room-by r…

1. Deep cleaning too soon

This is not the time for deep cleaning every little corner of every little drawer.  Right now we are focusing on step one:  staging for marketing photos & future showings.   It’s a lot of work on it’s own, don’t bog yourself down by trying to deep clean as you go.

Yes, before moving out every drawer and cupboard and baseboard and window track needs to be scrubbed.  I would even suggest once your photos are taken starting to tackle these things during the time your home is listed so that as potential buyers come for showings, your house looks it’s best.  But right now, you are slowing yourself down & wasting your time if you are focused on deep cleaning, especially if you are still living in the home.

It’s best to focus your time & energy on a good basic ‘clean, declutter & style’.  This is the time to focus on first impressions and welcoming people into your home visually.

When is this actually worth it? 

If the house has been neglected for a bit too long and either looks or smells a bit dingy and it’s going to be obvious from photos or from standing at the front door, then yup, a deep clean is needed at this point.

My strategy: 

In each room, a quick basic clean & polish is all that’s needed.  Wash windows, wipe surfaces, dust, wash any walls that are obviously grimy, make sure it smells fresh, vacuum or mop the floor.  I do not scrub baseboards, worry about dust in window tracks, or clean inside cupboards or drawers.   The only small exception here is the bathroom:   I advise my clients completely scrub & deep clean every single thing in the bathroom, but even there I do not worry about cleaning inside the drawers and cabinets.

 
Learn exactly how to professionally stage a bathroom that sells. Get the 3-step plan that covers everything you absolutely need to get right before listing your home. Bonus: Immediate, free download of my Ultimate Staging Checlist PDF list room-by r…
True Design House - home staging - biggest wastes of time

2. Fixing nail holes

A tiny pin or nail hole is nearly invisible and takes zero minutes to deal with (slowly pull the nail out).   Alternatively, patching, sanding and painting a few nail holes in a wall takes an hour and looks horrible.  It's nearly impossible to color match older wall paint with a newly mixed can and even if you have some old paint leftover from the original job, the sheen will not match after only a few months.  Even further, going the extra mile and 'doing it right' by patching, sanding and repairing the entire wall (or likely, the entire room) will take a bit of money and half a day of time.

When is this actually worth it? 

If the room is painted a very outdated, bright, dark or bold color and needs to be repainted anyway or if the walls are really extra damaged (wall-mounted TVs, peeling vinyl stickers and intricate gallery walls, I'm looking at you.)

My strategy: 

Remove thumbtacks and obvious picture hangers.  Small nails are just gently pushed flat against the wall (this is less obvious than leaving a hole and can easily be pulled back out for the next owner to hang something on).

 
Learn exactly how to professionally stage a bathroom that sells. Get the 3-step plan that covers everything you absolutely need to get right before listing your home. Bonus: Immediate, free download of my Ultimate Staging Checlist PDF list room-by r…
True Design House - home staging - biggest wastes of time

3. Replacing or covering every family photo

Don’t waste your time replacing every family photo with different photos or art.  Just remove them.  Yes, it’s going to look empty to you… but to a buyer, this looks clean, airy , open and just fine.   You can take down every photo and take the back off, find a nice neutral photo of a landscape or abstract art in a book or online, put that into the frame, polish the glass front & back, replace the back, then hang the picture back up again… but, why bother?  It’s a very time consuming process for very little gain, especially when you have to do the entire process again in reverse at your new house. Don’t waste your time.

When is this actually worth it? 

If  you have some large framed photo as the only focal point in a room (above a couch or bed, or in the entry above a sideboard is common) then you should probably have something in those places.  The other situation is a large, detailed gallery wall with lots of pieces hanging in a styled arrangement and only some are family photos.  In this case, I would leave the entire wall as-is and replace or cover just the family photos.

My strategy: 

Remove, wrap & pack as many family photos as possible.  The ones that need to stay or be replaced (see above for the exceptions to the rule), I do a few different things.  For larger art, I will look for a large canvas in an abstract or landscape usually.  These are light enough to be hung on the existing mounting hardware.  For my staging clients, I loan these out but for you, I would look to see if someone you know has one you can borrow for a month or check for a used one online or in thrift shops before buying a new one.  If you have to buy a new one, look for one that you would love in your new house or just plan to sell it when you are done with it.    

For small framed photos, I rarely replace the actual photo (though if you just have a few and already have something that will be a good fit for the style of the room, you go right ahead).  My go-to trick is to just leave the frame right on the wall and put a small ball of tape in each corner of the glass.  Then I take a small piece of nice wrapping paper in a neutral or fitting color and stick it on.  Then I just run my thumbnail around the edge to cut it off and tuck the edges under the frame. 

Lazy or smart & efficient?  You be the judge!   This has the added bonus of having all photos in the room or on the gallery wall match nicely.  This is going to look odd to you but in listing photos it’s perfectly subtle.  When people come for showings, if they notice at all they will understand why you styled it that way.

 
True Design House - home staging - biggest wastes of time

4. Moving around & storing things instead of just getting rid of them

This is a common one:  analysis paralysis.  People aren’t sure what they want to do with some things as they get ready to move, so instead of just making the decision to get rid of it, they put it in a closet, basement or spare room.  Then they move it around again.  Then they pack it into boxes.  Then those boxes need to be moved for listing photos.  Then they get buyer feedback that the storage room looked small, so they need to move all the boxes to the garage.  Then when they finally move, after carrying it all to the new house,  they unpack it and realize they didn’t want this stuff anyway, and finally take steps to get rid of it.  What a waste of time. 

This is a time to be efficient – if you can just be honest with yourself about the stuff you no longer need and get rid of it as you are preparing to stage, you are going to really lighten your load (mentally and physically!)  Remember, all people want is a clean slate and the less ‘stuff’ you have in your home, the more open and clean it looks.  Getting rid of excess baggage helps your mental state and helps sell your house. Win / win.

When is this actually worth it? 

If you have things that are valuable (financially or emotionally) and you don’t have time to properly assess and deal with them (and, be honest, you do not have time right now), then it’s better to store and move them around than make a rash decision you could regret later.

My strategy?

Look at each item and be as fast and discerning as a falling axe:  keep or go?  That ‘go’ pile should go straight into either garbage bags, boxes to go elsewhere or boxes to be sold.  The garbage should go straight outside as soon as you are done in each room.  The boxes for elsewhere should go straight to the car or garage (wherever it can be dealt with asap).  The boxes for selling should be put wherever you can easily take your photos… and please be real with yourself these things are actually worth selling with the time you have right now.   

Go room by room and finish up one room before you move on to the next.  Remember, every single thing you can get rid of at the beginning is something you don’t have to deal with again in this move.

 
True Design House - home staging - biggest wastes of time

5. Doing it all yourself

I know, moving can be a time where you are worried about finances.  It can also be a time when you feel like you are bleeding extra money (from buying new matching lightbulbs to eating out more than usual, it absolutely all adds up).  So, I come at this one from the place of ‘if you know you can swing this, then do it’.  Only you are going to know if you can truly fit this in the budget but don’t forget to also take into account the profit you will be making on your house by selling faster! With a professional doing the work it’s most often quicker and better than you or I would do.  There is also immense value in keeping your stress level reasonable.   

Very simply, doing it all yourself can turn out to be one of the biggest wastes of time you will regret.  From carpet cleaning to window cleaning to hiring a handyman for a few hours, you may find that having these things done by a professional is well worth the money it costs.  It gets the job DONE and done quickly and properly.  There are many things that are best for you to do yourself and some that are simple to do and sometimes not worth paying someone else, but those things are going to be different for every seller.

When is this actually worth it? 

If you have no extra funds for this or no family or friends able to help, then that answers that.  You can certainly do it all yourself (I sure have!) and you can do a damn good job of it, too.  So, if you simply aren’t able to get some help, get your plan in place and do what you have to do to get it done.  None of this is hard stuff, you’ve got this!

My strategy? 

Make a master list of things that need to be done.  Walk through the house and write it all down.  Now, look at that and mark the ones that are in your wheelhouse.  You might have experience, time, energy, expertise in those areas and you can get them done quickly and easily in the time you have.  Now, for the remainder of the list, can you ask for some help from a friend or family member for any of them?  And, lastly, the remaining items (this might mean moving some things from your other lists if there’s nothing left!) can you hire them out?  Don’t waste every ounce of energy you have doing every single thing if you have the means to get some help.  Even hiring out one or two tasks is a much more efficient use of your time and lets you breathe a little (and be ready to list faster).


I hope this list helps you to get to work doing the things that actually need to be done! I know that time is too critical right now to bother with these 5 wastes of time.

Using your time efficiently is one of the best things you can do for yourself when you are getting ready to sell your home.


The

Staging Prep Kit is here & it’s free!

If you are getting ready to sell your home, this is for you.

If you are a realtor and looking for a staging plan to include in your new client kits, this is also for you!

A curated, strategic grouping of my checklists & tips for staging your own home. I created it to teach you exactly what you need to do and how to do it as simply as possible.

Ready for free & immediate download!